By: Loretta Sebastiani

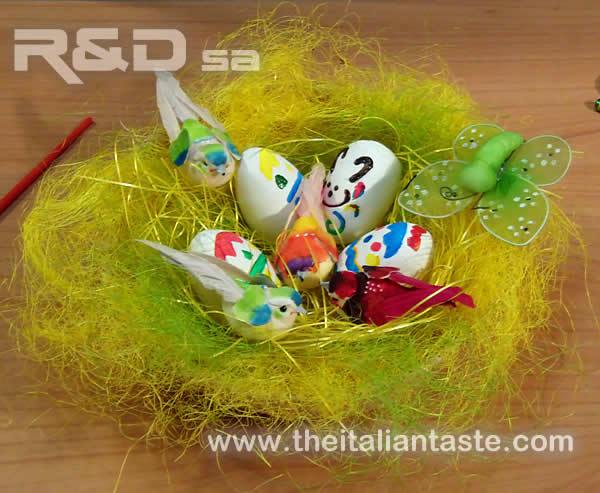
Nest with hand-decorated eggs
Two different types of hand-decorated eggs: stenciled and wrapped in felt cord
Easter decorations are based on eggs. I generally use polystyrene, plastic, wood or ceramic eggs and prepare them in many different ways. I wrote in the Italian Taste's blog the reason why in these pages you will ever find no idea to decorate fresh eggs. The hand-decorated eggs that I propose are very simple to make and may also be done with the help of your children. They are a nice decoration for your home, laid in a nest, or a nice centerpiece too. Other ideas to decorate your home for Easter or spring?

You'll need ...
... for the eggs wrapped in felt cord
- - Foam eggs ( 6 and 10 cm high)
- - Felt cord - 4 meters per every 10 cm high egg
- - Cotton piping cord - at least 2,5 meters per every 6 cm high egg
- - Flowers for decorations - Stamperia
- - Little daisies - Knorr Prandell
- - Patchwork pins
- - Other spring decors: little butterflies and birds
... for the hand-painted eggs
- - Wood eggs
- - White acrylic paint plus other colors
- - Egg stencils
- - Little butterflies, birds and flowers
- - Little brushes
... for decorating the nest
- - Little basket
- - Yellow Easter grass
- - Green Easter grass
- - Glossy yellow Easter grass
I decorated my eggs in two ways, very different from each other but both simple.
The first decorating idea is refined and uses natural materials and colors that resembles me spring season.
The second decorating idea is much simpler and can be made by your own children without any help. It's enough to buy the items listed above or, simplier, an Easter egg stencil kit such as this. It includes stencils, brush and paints.
But if you make sure your kids have more fun, create a story for every egg. More details below.
What you can find in this page
- - Video
- - Easter eggs wrapped in the felt cord: step-by-step instructions
- - Hand-painted Easter eggs: step-by-step instructions
- - How to make the nest
Video
Here's the video. Pardon for my English, plese :-)
The video shows you the most important steps to decorate both the eggs and how to prepare the nest. Read more details below.
Easter eggs wrapped in felt or cotton cord: step-by-step instructions
- - To do this Easter decoration you need foam eggs and felt or cotton cords which can then be reused easily in the next years to create other decorations.
- - To decorate foam eggs you have to wrap your cord around the template.
Fix your cord with patchwork pins as shown in the video. - - Once completed this step, it will be enough to arrange flowers in order to hide the pins used previously.
Remember to fix flowers with some patchwork pins in a hidden way. More details in the video.
If you have some cord left, do not cut it. Make a knot or a ribbon at one end. - - Big eggs are decorated with a cord of thick felt, while small ones with cotton piping cord.
- - As you can see, I used large flowers for big eggs, little daisies for small ones.
- - Choose colors according to your taste and the use that you'd like to do.
- - If you like the idea of the nest arrange your decorated eggs in the basket and then all the little butterflies and birds you have chosen.
- - Another idea could be to make only one big egg and place it on an egg cup. Delicately beautiful!
Hand-painted Easter eggs: step-by-step instructions
- - To make this Easter decoration, you need wood eggs, acrylic paints and little brushes.
- - First of all you have to pass one or more coats of white paint on your wood eggs.
You can do it with a brush or a foam swab.
Let dry very well and then make the second step. - - Apply the stencil over your egg and then paint with the brush, dipped into the color, within the outline several times, trying to apply the color uniformly.
Turning to another color, you have to wash and dry the brush very well.
But you could use as many brushes as there are the colors. - - When completed, remove the stencil and let colors dry very well.
- - At this point you could make other decorations with marking pens of contrasting colors, if liked.
- - Arrange your hand-painted eggs in the nest and add all the other items you've chosen. Butterflies, birds, flowers ...
- - Your Easter or spring decoration is ready!
- - Every little egg can be a nice placeholder. Look at the video for more details!
How to prepare the nest
- - The nest is very simple.
- - Take the basket and fill it with yellow and green Easter grass.
- - Add some glossy yellow Easter grass to have a better effect.
- - The Easter or spring nest is ready.
- - If you want you can also garnish the basket outside.
Rate this!