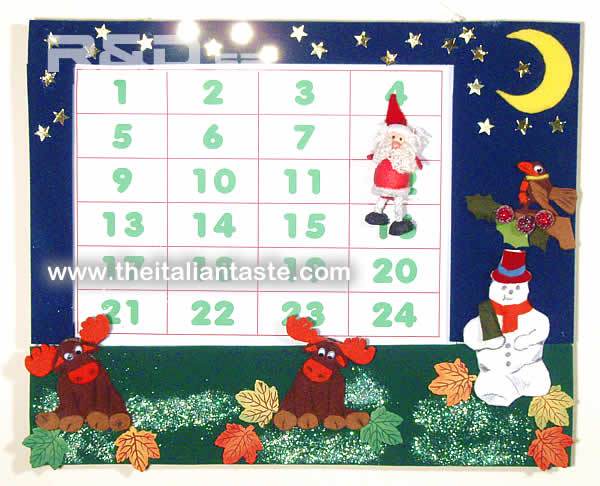
Countdown to Christmas
How many days to Christmas? how many days to Santa? Let's count together with our children ...
Countdown to Christmas is no expensive and easy-to-make Advent Calendar. It's a cheap Christmas decoration if you have leftover felt pieces from other works (you need a very little amount of every color). Besides you can use magnetic board for other purposes after Christmastime. A nice craft idea for your kids, isn't it?
zoom »
You'll need
- - Magnetic white board (39 x 29 cm)
- - Cardboard
- - Self-adhesive paper, green and blue
- - White foam rubber sheet (Gütermann creativ)
- - Brown foam rubber sheet (Gütermann creativ)
- - White felt sheet, 20x30 cm (Gütermann creativ)
- - Yellow felt sheet, 20x30 cm (Gütermann creativ)
- - Orange felt sheet, 20x30 cm (Gütermann creativ)
- - Dark brown felt sheet, 20x30 cm (Gütermann creativ)
- - Pale brown felt sheet, 20x30 cm(Gütermann creativ)
- - Pale green felt sheet (Gütermann creativ)
- - Dark green felt sheet (Gütermann creativ)
- - Pale blue felt sheet (Gütermann creativ)
- - Red felt sheet (Gütermann creativ)
- - Moon/stars, glitter in bags (Gütermann creativ)
- - Wiggling eyes, 7-9 mm (Gütermann creativ)
- - Wood autumn leaves (KnorrPrandell)
- - White glitter dust
- - Red berries
- - Spray glue
- - Polyvinyl acetate glue
- - Hot glue gun
- - A4 papers
- - Magnetic Santa
- - A pen
- - Scissors
- - Patterns of elk, snowman, bird, moon and calendar (download and print)
- - UHU Patafix

(136 download)
How to make a simple Advent Calendar with felt and images downloaded from Internet
- - Step 1. White board.
Enlarge your board with a frame made with cardboard, covered with adhesive paper.
This frame is the support for the figures and hides the edges of your board.
Use an old shoe box and cut out four rectangles with these dimensions: 39,5 x 9 cm - 9 x 23 cm - 31 x 3,5 cm - 3 x 20,5 cm.
Cover the first with green adhesive paper and the others with blue paper.
Stick the four rectangles on the edge of the board using UHU patafix.
So you'll be able to detach the frame easily.
But I suggest to reinforce the adhesion between patafix and cardboard with a drop of hot glue.
At this point spray glue on the green rectangle and then sprinkle it with white glitter dust (snowy effect). - - Step 2. Download and print all patterns.
Patterns can be downloaded by following these links (elk, snowman, bird, moon and calendar).
Then you have to print them into white A4 papers. - - Step 3. The calendar.
Put the calendar inside the white board.
Use magnetic Santa to fix it.
If you don't find magnetic Santa you like, you can make it gluing a little magnet on Santa's back you prefer. - - Step 4. The patterns.
Cut out all patterns from the paper.
Then draw the outline of the elk (twice) and bird into the brown foam rubber sheet.
Draw the outline of the snowman and moon into the white foam rubber sheet.
Cut out all the shapes.
Use the foam rubber is giving depth to the characters, that's why I use it.
If you can't find it use a material that makes you get the same effect.
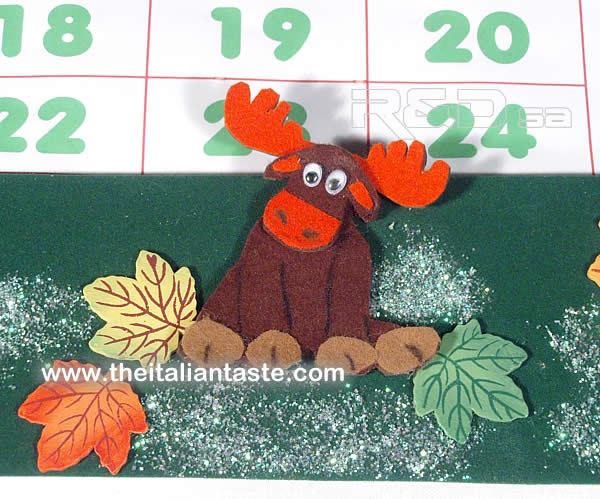
- - Step 5. Make the elks.
Cut out two elk shapes from the dark brown felt using their template.
Glue them on the corresponding brown foam rubber.
Now work on the details.
Cut out the following details from the paper pattern: hoofs, muzzle, horns and ears.
Now, using the template, cut out the muzzle shape at first from the brown foam rubber and then from the orange felt.
At this point glue the rubber muzzle at its place and then the felt muzzle above it.
Go on with the other details: horns and ears are to be cut out from the orange felt while hoofs from the pale brown felt.
Glue all these details at their place.
Complete with the wiggling eyes.
Draw the two nostrils on the muzzle and more details on the hoofs with a pen.
Look at the photo for more details.
Glue the elks on the green rectangle with hot glue gun.

- - Step 6. Make the snowman.
Cut out the whole snowman from the white felt using the template.
Glue it on the white foam rubber.
Cut out the details of the hat and right arm from the paper pattern.
Now cut out the arm from the white felt, hat from the blue, green and red felt.
Cut out a long rectangle from the orange felt: it will be snowman's scarf.
Tie this scarf around your neck and glue the other details at their place.
Draw the details of the face, buttons, arms and legs with a pen.
Look at the photo for more details.
Glue your snowman between green and blue rectangles. - - Step 7. Make the moon.
Cut out the moon from the yellow felt using the template.
Glue it on the foam rubber pattern.
Place the moon in the upper right corner with a drop of hot glue.
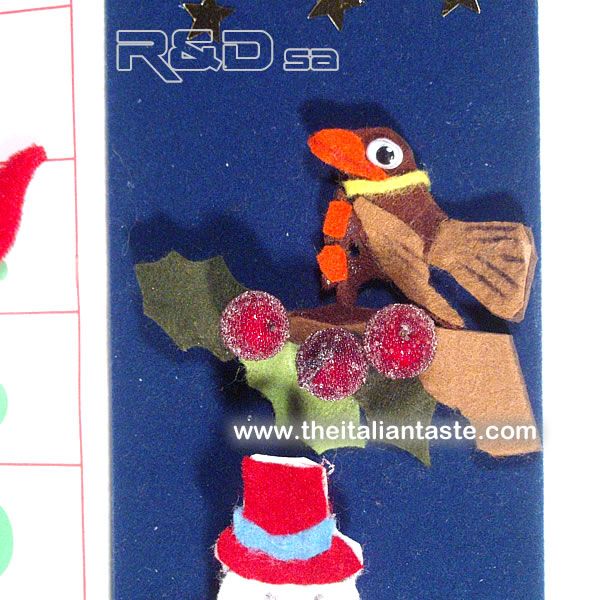
- - Step 8. Make the bird.
Cut out the bird from the brown felt using the template.
Glue it on the foam rubber pattern.
Then go on with the details.
Cut out its tail and wing from the pale brown felt, beak and chest pieces from the orange felt, collar from the yellow felt.
Glue all these details and a wiggling eye at their place.
Glue the whole bird above the snowman. - - Step 9. The last details.
Make some leaves in two different green colors and a little branch.
You have the best result if you cut out them at first from the brown foam rubber and then from the felt.
The tecnique is the same you have just used for the other figures.
Complete with some red berries.
Complete your work gluing a lot of stars on the sky and leaves near the elks. - - Look at all photos for more details.
- - Hang this D.I.Y. Christmas decoration where you prefer but the most important thing is that you let your children work with you. There is no better way to get into the holiday spirit than making easy crafts with your kids.
- - It can be a nice solution for decorating the window of a children shop.
- - You can also use this Christmas decoration in the following years but you can choose to undo it and use the white board as memorandum.
Rate this!
Rating: 5 / vote cast: 1
Author: Loretta Sebastiani
Twitter | Facebook | Pinterest