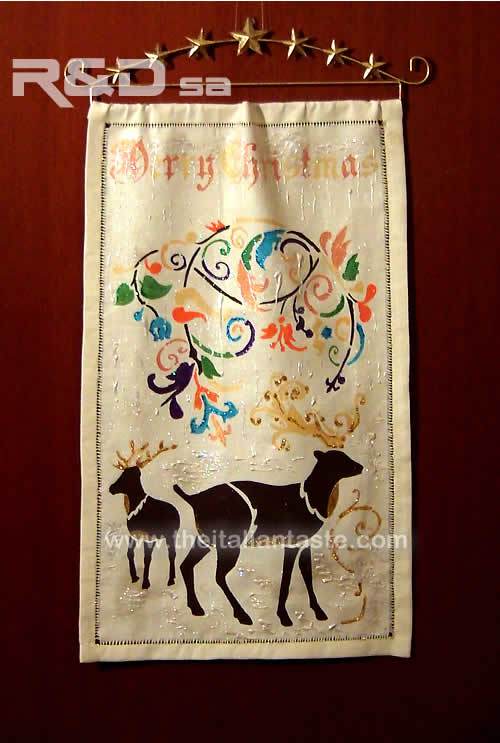
Handpainted Christmas panel
Handpainted linen panel with Xmas deers: a new way to adobe your main door
This handpainted panel is really a very special and original Christmas decoration. Nowadays everyone can paint on canvas or any other media thanks to templates that are easily found in D.I.Y stores. The only thing is to have patience. The size that I propose is suitable for a main door.
zoom »
You'll need
For the panel
- - Medium weight linen in ivory color (40x65cm - 15.7x25.6in)
- - Embroidery thread in gold color
- - Basting thread
- - Needle
- - Scissors
- - A support to hang the Christmas panel
For the decoration
- - Stencil M Classic Merry Christmas - cm44x30 -
Code KSM008 (Stamperia) - - Stencil M Reindeers and deco - cm 44x30 -
Code KSM002 (Stamperia) - - Colors for fabrics: chestnut, dark viol, shiny gre, sky blue, coral pink (Stamperia)
- - Metallic acrylic paints for fabrics: gold, golden copper (Stamperia)
- - Glitter powder: light blue, emerald green, orange, violet (Stamperia)
- - Glamour Liner (Gutterman creativ) - gold
- - Acrylic colors 3D: white
- - Brushes in different size
- - Paper painter tape
- - Colle gel (Stamperia)
- - Spray glue (Stamperia)

(94 download)
How to make a handpainted decoration for Holiday Season
- - Prepare the panel.
Cut off a perfect rectangle from the linen.
Now you have to hemstitch your linen panel.
So the first step is pulling away the threads from linen.
They should be pulled away according to the size to be enclosed within the hemstitching and to the width of the hem outside the stitching.
The hem outside the stitching must be 1.5cm wide in this case.
Remember the linen must be folded twice to baste a regular hem.
So take the measures very well and then pull away several threads from the material where the double fold of the hem will come, from side to side, leaving a block of the material at each corner.
Baste the hem and then hemstitch using an embroidery thread in gold color.
Remember to let free the upper hem: you have to insert the support to hang the panel. - - Paint the linen panel.
Stretch the linen panel on a smooth surface.
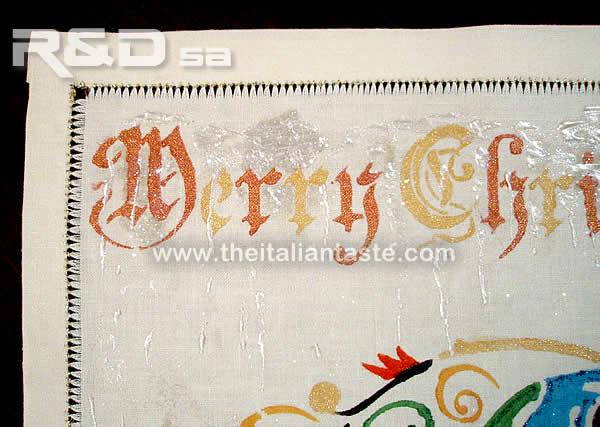
Begin with Merry Christmas.
Apply the stencil on the upper edge of the panel and fix it to the linen and surface with pieces of painter tape.
Be sure the linen and stencil don't move.
Don't apply the spray glue on the back of the stencil as written in many instructions: it can stain the fabric indelebly!
Prepare the chosen colors, in this case the metallic acrylic paints, and one brush for each color.
Dip the brush into the color and remove from it a little bit of color with some blotting paper before realizing the decoration.
Alternate the gold with the golden copper and paint all the letters as you can see in the photo.
Let the colors dry very well.
Remove this stencil and apply the stencil with reindeers.
Make your decorations following my tips as described above.
Let the colors dry very well and remove the stencil. - - The last step.
Make the last decorations.
Using the Glamour Liner, paint the stomach and a portion of the neck of the reindeers.
Look at the photo for more details.
Then mark some details of their horns (especially on the points) and of the decoration near the biggest reindeer.
Using a very little brush apply a bit of colle gel along the edges of some leaves or flowers and then sprinkle the glitter powder of the same color.
Let dry very well.
Complete the Christmas panel using the 3D color.
Draw some drops and snow around the reindeer paws.
Let dry very well. - - Your Christmas panel is ready!
- - Hang your Chrstmas panel on your main entrance or a wall or anywhere your fancy suggests to you.
Rate this!
Rating: 5 / vote cast: 1
Author: Loretta Sebastiani
Twitter | Facebook | Pinterest